2021年3月27日 星期六

XML使用CDATA避免&符號解析失敗

因為國外的客戶姓名有&
導致XML格式錯誤
必須使用CDATA把姓名欄位包以來

https://stackoverflow.com/questions/2784183/what-does-cdata-in-xml-mean

Example:

The string contains "&" in it.

You can not:

<FL val="Company Name">Dolce & Gabbana</FL>

Therefore, you must use CDATA:

<FL val="Company Name"> <![CDATA["Dolce & Gabbana"]]> </FL>

2021年3月10日 星期三

內網環境編譯Maven專案,設定Proxy的步驟

一般公司電腦連外上網都會透過Proxy Server,編譯Maven專案時需要特別設定Proxy並將Maven網站的SSL憑證匯入到keystore,步驟如下。

(一)
設定Proxy:
settings.xml放在使用者目錄的.m2資料夾

(二)
因為Maven站台使用https連線,需要透過瀏覽器匯出並將此SSL憑證匯入到keystore
參考
https://stackoverflow.com/questions/25911623/problems-using-maven-and-ssl-behind-proxy

Use a browser (I used IE) to go to https://repo.maven.apache.org
Click on lock icon and choose "View Certificate"
Go to the "Details" tab and choose "Save to File"
Choose type "Base 64 X.509 (.CER)" and save it somewhere

Now open a command prompt and type (use your own paths):
keytool -import -file C:\temp\mavenCert.cer -keystore C:\temp\mavenKeystore

(三)
加入以下紅色參數(以執行Spring Boot專案為例)
mvn spring-boot:run -Djavax.net.ssl.trustStore=C:\temp\mavenKeystore


備註:
如果沒有設定 -Djavax.net.ssl.trustStore=會有以下錯誤訊息
Maven sun.security.validator.ValidatorException: PKIX path building failed: sun.security.provider.certpath.SunCertPathBuilderException: unable to find valid certification path to requested target

2021年3月2日 星期二

Spring Security Reference (5.0.12)

https://docs.spring.io/spring-security/site/docs/5.0.12.RELEASE/reference/html/

disable-url-rewriting =“true

https://www.cnblogs.com/xjknight/p/10897849.html

从Spring 3.0开始,现在可以通过在命名空间中设置disable-url-rewriting =“true”来禁用将jsessionid附加到URL的URL重写逻辑。

web.xml方式設定:
<session-config>
     <tracking-mode>COOKIE</tracking-mode>
</session-config>

Java config方式設定:
servletContext.setSessionTrackingModes(EnumSet.of(SessionTrackingMode.COOKIE));

Cookie的setHttpOnly()和setSecure()

https://openhome.cc/Gossip/ServletJSP/Cookie.html

https://ajoshow.com/2017/07/19/201707192223/


Spring設定
https://www.itread01.com/content/1558404302.html
public class MainWebAppInitializer implements WebApplicationInitializer {
    @Override
    public void onStartup(ServletContext sc) throws ServletException {
        sc.getSessionCookieConfig().setHttpOnly(true);        
        sc.getSessionCookieConfig().setSecure(true);        
    }
}

2021年3月1日 星期一

ddd-by-examples

https://github.com/ddd-by-examples/library

Requirements

  • Java 11
  • Maven


REST API的四個Level

https://martinfowler.com/articles/richardsonMaturityModel.html


Know how RESTful your API is: An Overview of the Richardson Maturity Model
https://developers.redhat.com/blog/2017/09/13/know-how-restful-your-api-is-an-overview-of-the-richardson-maturity-model/


你的REST不是REST?
https://www.ithome.com.tw/voice/128528


Spring HATEOAS
https://spring.io/projects/spring-hateoas
https://openhome.cc/Gossip/Spring/HATEOAS.html

Spring Security設定同個使用者一次只能一個session登入

// https://www.baeldung.com/spring-security-session
//同個使用者一次只能一個session登入,重複原本登入的會回應This session has been expired (possibly due to multiple concurrent logins being attempted as the same user).

http.sessionManagement().maximumSessions(1);


demo code:
https://github.com/imrexhuang/Spring-Boot-Security-Thymeleaf-Demo/commit/f65ba7740cfff0a13417ca12b3bbf052ae8e83bd

Spring Security CSRF不保護GET,HEAD,TRACE,OPTIONS等Safe Methods

https://matthung0807.blogspot.com/2019/11/spring-security-csrf-default-protection.html

Control the Session with Spring Security

https://www.baeldung.com/spring-security-session

demo code:
https://github.com/imrexhuang/Spring-Boot-Security-Thymeleaf-Demo

Thymeleaf加入Spring Security標籤的支援

        <dependency>
            <groupId>org.thymeleaf.extras</groupId>
            <artifactId>thymeleaf-extras-springsecurity5</artifactId>
        </dependency>


ref:
https://www.baeldung.com/spring-security-thymeleaf
https://www.thymeleaf.org/doc/articles/springsecurity.html
https://www.marcobehler.com/guides/spring-security

demo code:
https://github.com/imrexhuang/Spring-Boot-Security-Thymeleaf-Demo

JSR 315: Java Servlet 3.0 Specification

https://jcp.org/en/jsr/detail?id=315

https://openhome.cc/Gossip/ServletJSP/Configuration.html

https://zhuanlan.zhihu.com/p/81885441

使用Spring Boot免去web.xml

使用Spring Boot进行Web开发的时候,按照官方的推荐都是使用内嵌的Servlet容器,和应用一起打包成jar包部署,当然,我们可以使用传统war包来部署,Main Class只需继承org.springframework.boot.web.servlet.support.SpringBootServletInitializer即可(启动时会加载所有ServletContainerlnitializer)。

免去web.xml是通过Servlet 3.0中的javax.servlet.ServletContainerInitializer来实现的,ServletContainerInitializer是提供了一个实现和web.xml类似功能的接口,在应用启动的时候能够通过编程的方式来注册Servlet、Fileter、Listener的功能。

SpringBoot通过Servlet3.0的这个设计,结合SPI机制,在spring-web包下发现META-INF/services/javax.servlet.ServletContainerInitializer实现类:org.springframework.web.SpringServletContainerInitializer从而进行初始化,包括对DispatcherServlet的注册,ContextLoaderListener的注册等等,最终免去web.xml


2021年2月28日 星期日

Default Password Encoder in Spring Security 5

https://www.baeldung.com/spring-security-5-default-password-encoder

org.springframework.security.crypto.bcrypt.BCryptPasswordEncoder


ref:
https://openhome.cc/Gossip/Spring/SpringSecurity.html

從 Spring Security 5 開始,強制必須對密碼進行編碼,具體而言,方式之一就是直接指定 PasswordEncoder,在這邊使用的是 BCryptPasswordEncoder,並透過 encode 對密碼編碼,實際上這會是在使用者註冊時進行這動作,不過這邊先暫且寫在設定檔裡。

BCryptPasswordEncoder 實作了 bcrypt 加密演算法,是 Spring 官方推薦的加密方式,它會使用一個加鹽的流程以防禦彩虹表攻擊,就算是相同的密碼,因為每次產生的鹽值不同,編碼後的結果也就不會相同(鹽值會包含在編碼後的結果之中,不過 bcrypt 屬於 Slow Hash Function 手法,也就是破解它的時間成本高,高到可以讓攻擊者放棄)。

Intro to Spring Security Expressions

https://www.baeldung.com/spring-security-expressions

Reload Templates without Restarting the Container

https://docs.spring.io/spring-boot/docs/current/reference/htmlsingle/#howto-hotswapping

Thymeleaf Templates

If you use Thymeleaf, set spring.thymeleaf.cache to false. See ThymeleafAutoConfiguration for other Thymeleaf customization options.

FreeMarker Templates

If you use FreeMarker, set spring.freemarker.cache to false. See FreeMarkerAutoConfiguration for other FreeMarker customization options.

Groovy Templates

If you use Groovy templates, set spring.groovy.template.cache to false. See GroovyTemplateAutoConfiguration for other Groovy customization options.

DEMO:
https://github.com/imrexhuang/Spring-Boot-Security-Thymeleaf-Demo

2021年2月25日 星期四

Using the Quarkus Framework on Fedora Silverblue

https://fedoramagazine.org/using-the-quarkus-framework-on-fedora-silverblue-just-a-quick-look/

Installing Silverblue
https://docs.fedoraproject.org/en-US/fedora-silverblue/installation/

RHEL找出java實際安裝路徑

顯示安裝的是jdk11


顯示的版本卻是jdk8
[root@localhost ]# java -version
openjdk version "1.8.0_282"
OpenJDK Runtime Environment (build 1.8.0_282-b07)
OpenJDK 64-Bit Server VM GraalVM CE 21.0.0.2 (build 25.282-b07-jvmci-21.0-b06, mixed mode)


後來才發現是graalvm底下的jdk
[root@localhost ]# readlink -f $(which java)
/graalvm/bin/java

ref:
https://stackoverflow.com/questions/33104982/how-to-get-java-path-in-centos

2021年2月24日 星期三

RHEL和CentOS切換Java版本

sudo alternatives --config java

ref:
https://phoenixnap.com/kb/install-java-on-centos

QUARKUS - 用 MAVEN 构建应用

https://quarkus.pro/guides/maven-tooling.html

COMPILING YOUR QUARKUS APPLICATIONS TO NATIVE EXECUTABLES

https://access.redhat.com/documentation/en-us/red_hat_build_of_quarkus/1.7/html-single/compiling_your_quarkus_applications_to_native_executables/index

Redhat官方的quarkus demo code

https://github.com/redhat-developer-demos/quarkus-tutorial

(1)
sudo yum install maven

備註:需要3.5.3以上版本
可用mvn --version指令查看目前版本

RHEL更新Maven方式:
https://computingforgeeks.com/installing-latest-apache-maven-on-centos-fedora/
需先sudo yum remove maven


(2)
git clone https://github.com/redhat-developer-demos/quarkus-tutorial.git

(3)
cd quarkus-tutorial

(4)
export TUTORIAL_HOME='pwd'
export QUARKUS_VERSION=0.21.2

(5)
mvn "io.quarkus:quarkus-maven-plugin:$QUARKUS_VERSION:create" \
  -DprojectGroupId="com.example" \
  -DprojectArtifactId="fruits-app" \
  -DprojectVersion="1.0-SNAPSHOT" \
  -DclassName="FruitResource" \
  -Dpath="fruit"

(6)
確認檔案已產生
cd fruits-app
ls -al

(7)
已開發模式啟動(具備Hot Reload功能)
./mvnw compile quarkus:dev

(8)
啟動後會看到以下訊息
2021-02-24 21:10:49,700 WARN  [io.qua.dep.QuarkusAugmentor] (main) Using Java versions older than 11 to build Quarkus applications is deprecated and will be disallowed in a future release!
2021-02-24 21:10:52,875 INFO  [io.quarkus] (Quarkus Main Thread) fruits-app 1.0-SNAPSHOT on JVM (powered by Quarkus 1.12.0.Final) started in 0.700s. Listening on: http://localhost:8080
2021-02-24 21:10:52,882 INFO  [io.quarkus] (Quarkus Main Thread) Profile dev activated. Live Coding activated.
2021-02-24 21:10:52,882 INFO  [io.quarkus] (Quarkus Main Thread) Installed features: [cdi, resteasy]


=======以下是改用Native模式編譯
(9)
oc new-project quarkustutorial

(10)
編譯成native executable(需安裝GraalVM)
./mvnw package -DskipTests -Pnative

Windows平台編譯問題請參考以下文章
https://quarkus.io/guides/building-native-image#producing-a-native-executable

如果沒安裝GraalVM,使用container runtime(預設是使用docker,可用下方指令指定)
./mvnw package -DskipTests -Pnative -Dquarkus.native.container-build=true
https://quarkus.io/guides/building-native-image#quarkus-native-pkg-native-config_quarkus.native.container-build


https://quarkus.io/guides/building-native-image
By default Quarkus automatically detects the container runtime. If you want to explicitely select the container runtime, you can do it with:
# Docker
./mvnw package -Pnative -Dquarkus.native.container-build=true -Dquarkus.native.container-runtime=docker

# Podman
./mvnw package -Pnative -Dquarkus.native.container-build=true -Dquarkus.native.container-runtime=podman

2021年2月23日 星期二

Quarkus開發模式的Hot reload

指令
./mvnw compile quarkus:dev

log檔
2021-02-23 01:52:03,239 INFO  [io.qua.dep.dev.RuntimeUpdatesProcessor] (vert.x-worker-thread-5) Changed source files detected, recompiling [/home/javadev/fruits-app/src/main/java/com/example/FruitResource.java]
2021-02-23 01:52:04,184 INFO  [io.qua.dep.dev.RuntimeUpdatesProcessor] (vert.x-worker-thread-5) Application restart not required, replacing classes via instrumentation
2021-02-23 01:52:04,258 INFO  [io.qua.dep.dev.RuntimeUpdatesProcessor] (vert.x-worker-thread-5) Hot replace performed via instrumentation, no restart needed, total time: 1.020s

2021年2月5日 星期五

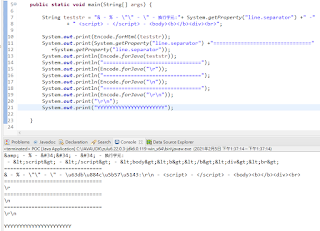
OWASP Encode forHtml和forJava的差異

Encode.forHtml:
可防範XSS(Cross-Site Scripting),把「<」、「&」、「>」、「"」、「""」這類的特殊字元取代成「&lt;」、「&amp;」、「&gt;」、「&#34;」、「&#34;&#34;」。
但是不會取代「換行字元」,無法防範Log Forging (日誌偽造),防範Log Forging一定要取代「換行字元」

Encode.forJava:
可防範Log Forging (日誌偽造),把「換行字元」取代

Source Code:
https://github.com/OWASP/owasp-java-encoder/blob/main/core/src/main/java/org/owasp/encoder/Encode.java

官網:
https://owasp.org/owasp-java-encoder/
目前最新版是1.2.3,可用在Java 5以上的專案。

encoder-jsp-1.2.3.jar是JSP tag方式使用,jsp檔需要聲明taglib如下
<%@taglib prefix="e" uri="https://www.owasp.org/index.php/OWASP_Java_Encoder_Project" %>

encoder-1.2.3.jar是直接透過Method方式呼叫使用,可以用於一般java程式。

REF:
https://owasp-top-10-proactive-controls-2018.readthedocs.io/en/latest/c4-encode-escape-data.html


2021年1月24日 星期日

HikariCP Example

Java 6
https://github.com/imrexhuang/HikariCPClientExample/tree/master/ForJava6

Java 8+
https://github.com/imrexhuang/HikariCPClientExample/tree/master/ForJava8%2B

HikariCP
https://github.com/brettwooldridge/HikariCP#configuration-knobs-baby

HikariCP Maven:
https://search.maven.org/search?q=com.zaxxer.hikaricp

作者:Brett Wooldridge
https://github.com/brettwooldridge

作者為何要開發HikariCP的專訪
https://dzone.com/articles/jooq-tuesdays-what-it-takes-to-write-the-fastest-java-connection-pool

【追光者系列】HikariCP默认配置


利用SQL Server的sp_who指令查看
沒有設定setMinimumIdle和setMaximumPoolSize時,的確預設是建立10個Connection


超過預設10個Connection會出現以下錯誤訊息,無法再用HikariDataSource去getConnection導致timeout:

java.sql.SQLTimeoutException: Timeout after 30004ms of waiting for a connection.
    at com.zaxxer.hikari.pool.BaseHikariPool.getConnection(BaseHikariPool.java:233)
    at com.zaxxer.hikari.pool.BaseHikariPool.getConnection(BaseHikariPool.java:183)
    at com.zaxxer.hikari.HikariDataSource.getConnection(HikariDataSource.java:93)
    at HikariCPDataSource.getConnection(HikariCPDataSource.java:33)
    at SQLServerPOC.main(SQLServerPOC.java:25)